Breaking News

Search This Blog

Monday 24 March 2014

Change Processor Name Permanently

Change Processor Name Permanently

A while ago on Tweak And Trick, I published an article on changing your processor name. But recently, Anil Kumar pointed out that the trick only changed the name temporarily.

After a user restarts his computer, the name reverted back to original which is obvious as each time Windows boots, it checks the connected hardware and updates the registry value automatically. So,changing the processor name using the earlier article did not had permanent effect on the processor name.

Thus, the alien processor name you had earlier again reverted back to the boring old one.

Change Processor Name Permanently

Problem: To, make the name change permanent, it was required that the user updates the Processor Name String registry key each time when Windows starts.

Solution: It is very easy to change your processor name permanently by creating a registry key and placing a shortcut to it in the windows start up folder. To do so, just follow the steps given below:-


Steps :-
1.  Open Notepad.
2.  Copy and paste the exact code given below:-

Windows Registry Editor Version 5.00

[HKEY_LOCAL_MACHINE\HARDWARE\DESCRIPTION\System\CentralProcessor\0]
"ProcessorNameString"="My Processor name 50000MHz"
To change the processor name, edit the part of the code given in blue. Also understand that \0 in the above code should only be present if Windows store your processor name at that location. Please open Registry Editor and navigate to the above mentioned keys to check whether or not to include the \0.

3.  Click on File Menu, click on Save As and select "All Types" in Save as Type option. Save the file as ProcessorNameChange.reg or *.reg.
4.  Create a new shortcut on your desktop. Enter regedit / S "Location of the .reg file" as the location of the item. For example, enter regedit /S "C:\Processor Name.reg" if your registry file is located in the root of C:\ drive.

Processor Name

5.   Copy the created Shortcut file.
6.  Navigate to C:\Documents and Settings\All Users\Start Menu\Programs\Startup (in Windows XP) or toC:\Users\ User-Name\AppData\Roaming\Microsoft\Windows\Start Menu\Programs\Startup (in Windows 8, Windows 7 and Windows Vista. Also remember that AppData is a hidden folder.)  if C: is your System drive.
7.  Paste the copied file.


This registry file would now execute each time when Windows starts and the Processor Name String would be modified each time. So, even upon restarting your computer, you will see that the changed processor name is permanent.
Read more ...

Create a Shortcut to lock your Computer

Create a Shortcut to lock your Computer

Have you ever left your PC in a hurry? Have you ever felt that it is a pain to lock your system in the simple way of doing CTRL+ALT+DEL? I would imagine that you have and then, this trick is for you. This trick enables you to create a shortcut to lock your computer instead of doing the regular CTRL+ALT+DEL, thus providing you a way to quickly and easily get away from your PC whenever you are in a hurry.

To use this trick, follow the instructions given below:-

Steps
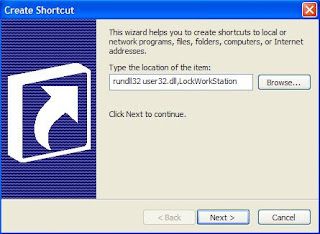
  1. Right Click on an empty slot on Desktop, point to New and click on Shortcut.
  2. In the dialog box that pops up, type the following code without quotes in the Type the location of the item.
rundll32 user32.dll,LockWorkStation
     3.  Click on Next and type a name for the shortcut in the Type a name for this 
          Shortcut textbox.
     4.  Click on Finish.

Create a Shrtcut to lock your System

Now you will be able to lock your computer by double clicking on the created shortcut. You can also add this shortcut to Quick Launch toolbar to lock your system with only a single click.
Read more ...

Make your Computer Talk

Make your Computer Talk

Have you ever wondered how can you make your computer speak whatever you input to it like in the movies? Would it not be fun? If only it was possible! Rejoice, because now it is possible. Well, if you wish to know how to do this, then you have come to the right place. With this trick, you can create a script in Windows which will make your computer speak whatever you input to it.

To create one such talk script, follow the steps given below:-

Make your Computer Talk

Steps
  1. Open Notepad.
  2. Copy and paste the exact code given below.
          Dim Message, Speak
          Message=InputBox("Enter text","Speak")
          Set Speak=CreateObject("sapi.spvoice")
          Speak.Speak Message
        3. Click on File MenuSave As, select All Types in Save as Type option, and save the file as Speak.vbs or "*.vbs".
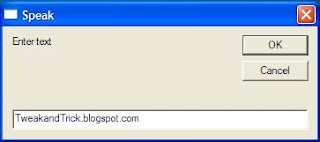
        4.  Double click on the saved file, a window will open like the one in the image. Enter some text in enter text column and click OK.

    Now your Computer will speak / talk what you typed in Step 4. Try it yourself.

    Windows Compatibility: This VBS file can be executed on all versions of Windows including Windows XP,Windows VistaWindows 7 and Windows 8.

    Personal Experience: I personally showed this trick to many of my friends and they were literally left awestruck. You too can impress your friends by making your PC talk and be the Computer Wiz.
    Read more ...

    Use Keyboard as Mouse [How To]

    Use Keyboard as Mouse [How To]

    If your mouse is not working and you don't wish to wait till you get a new mouse, you would definitely like to know how you can use your keyboard as your mouse. It is easy to use your mouse as keyboard in Windows using the On Screen Keyboard utility, but it is also possible to do the reverse.

    Keyboard Mouse

    All you need to do is:

    Windows XP Users:-
    1. Go to Control Panel.
    2. Then click on Switch to Classic View.
    3. Then Click on Accessibility Options.
    4. Then Click on the Mouse Tab.
    5. Select Use MouseKeys.
    6. Click on OK.
    7. Then activate NumberLock (by pressing the NumLk key).
    8. You should hear a beep sound.
    9. Now you can control the mouse pointer using the arrow keys on the numeric keypad.
    use keyboard as mouse


    Windows 8Windows 7 and Vista Users:

    1. Open Ease of Access Center by clicking the Start button , clicking Control Panel, clicking Ease of Access, and then clicking Ease of Access Center. 
    2. Click Make the mouse easier to use.
    3. Under Control the mouse with the keyboard, select the Turn on Mouse Keys check box.

    You can also increase the acceleration and speed of your mouse movements according to your needs.

    You can alternately press the Alt+Shift+Num Lock combination to instantly activate the mouse keys.


    Laptop Keyboard Mouse

    For laptops, this will only work if your laptop keyboard has a numeric keypad or alternative keys which you can enable by pressing the Number Lock Key or the Function key.

    On my laptop, number 6 key of the numeric keypad moves the mouse pointer left, number 4 key moves the mouse pointer right, number 2 key moves it down, number 8 key moves the mouse pointer up, number 5 and + key serve as right click while the number 0 key works as left click.
    Read more ...

    Change your Processor's Name

    Change your Processor's Name

    Are you bored with your old processor? Do you want a new processor with a breath-stopping name but are not going to upgrade any time soon? No need to worry. You can still have that new processor's name displayed in your computer. Well not only that, you can also have a better one than the one you are supposing to buy. Just follow this trick.

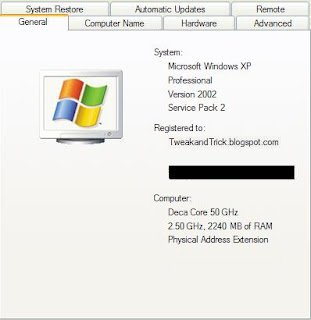
    With this trick, you can change the name of your processor to a personalized one like My Processor or something extreme like Decacore Processor 50 GHz .  These are just a few examples. You can change the name of your processor to anything you like.
    To have one such cool processor's name displayed in your computer, follow these steps:-
    1. Click on Start.
    2. Click on Run.
    3. Type "regedit" without quotes.
    4. Navigate to HKEY_LOCAL_MACHINE/HARDWARE/
    5. From HARDWARE, navigate to DESCRIPTION/System/CentralProcessor/.
    6. In the work area, double click on ProcessorNameString, and change its value according to your choice.
    7. Click OK


    Changed Processor Name


    Right Click on Computer icon and select properties.The final outcome would be something like the one in the image.

    Try it on your PC and show it to your friends to see the fun.

    P.S.: Personally, I have recently changed the name of my processor to "iLife Processor 7, Alien Technologies".  Tell me what you change yours to.
    Read more ...

    Add Background Images to Folders in Windows

    Add Background Images to Folders in Windows

    Suppose you have a music folder that contains all songs by your favorite singer. Would it not be great if instead of the plain white background, you could add the singer's image as the background of this folder?

    It is relatively easy to add background images to folders using a simple desktop.ini trick just as easily as you can change your Desktop's background.

    Desktop.ini is a system file that is used to customize the appearance and behavior of folders in Windows. We can use this ability of desktop.ini files to add backgrounds to folders just by adding a few lines of code.

    Folder Background in Windows
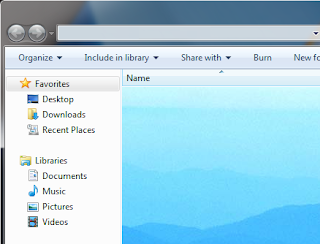
    This is how the background in folder looks like.

    Steps for adding backgrounds to Folders
    1. Open Notepad.
    2. Copy and paste the following code:-
    3. [{BE098140-A513-11D0-A3A4-00C04FD706EC}] iconarea_image="location of the image"
    4. You need to slightly modify this code on Windows Vista and Windows 7 as the ability to add folder backgrounds has been removed. So, if you use these versions of Windows, install AveFolderBGand then, replace [{BE098140-A513-11D0-A3A4-00C04FD706EC}] with [AveFolder] in the above code. To install this app, extract all the files and then, open the folder according to your installation of Windows (32 bit or 64 bit), right click install.bat and select Run as Administrator.
    5. In this code, iconarea_image is the parameter where the location of your image will go.
    6. Save the file as desktop.ini.
    7. Place this file in the folder where you want your personalized background.
    8. On Windows XP, you need to add system attribute to the folder where you want a background. To do this, open command prompt and execute "attrib +s D:\Music" (without quotes) if "D:\Music" is the location of your folder. If there are spaces in the location of your folder, you need to add double quotes around it. Windows Vista and 7 users need not add system attribute to folders.
    9. You might need to log off and log back on for the changes to take effect. Sometimes, AveFolder app fails to work in which case you need to restart Windows Explorer. I recommend you to create a System Restore point in case you do not like the results.

    You can hide this desktop.ini file if you feel that it is something that should not be visible in your folder.

    Tip: I am using this trick to have a personal picture as the background of the root folder of my flash drive. So, whenever I connect it to my Windows PC, the picture is displayed as the background. You can also do this but you should have the image in the drive itself. As you cannot assign a static location to the iconarea_image parameter (as the drive could be G:/ on one computer while F:/ on the other), you need to add the image's dynamic location. To do this, add "/{location of the image in flash drive}" as the value of iconarea_image. For example, if your image is located in the Pics folder in the flash drive, you need to have this value as:-

    iconarea_image=/Pics/Image.jpg

    It is important to note that the background to your flash drive will only be displayed on computers running Windows XP (if you have used the code for XP) or those computers running Windows 7 andWindows Vista that have AveFolder installed. Sadly, there is no way to make the background of your flash drive visible on all computers unless you modify your flash drive to automatically install this app on every PC you plug it in.

    If this trick does not work for you, do add a comment.
    Read more ...

    Command Prompt Tricks, Hacks & Codes

    Command Prompt Tricks, Hacks & Codes

    Command Prompt is one of the most powerful tools in Windows; but sadly, it is also the most ignored one. Things were not always like this; but with the advent of GUI based operating systems, people started feeling that computing through command based tools was boring. This ultimately lead the command prompt into obscurity.

    However, the command prompt is not useless. In fact, it can be pretty useful. This article provides some excellent tricks, secrets and hacks that will make you realize that the Windows Command Prompt is not only useful but also a tool that you should definitely give more respect to.

    Ascii star wars command prompt
    1-Watch ASCII version of the Star Wars Episode IV movie
    Surprised yet? You can watch an ASCII version of the full Star Wars Episode IV Movie right in your command prompt window. Just open command prompt, type a small code and the movie will start playing immediately. Read the complete instructions here.

    2- Create Matrix falling code effect
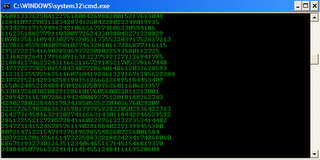
    Have you watched “The Matrix”? Of course, you have. Then, you already know what I am talking about. In case you still don't know what I mean, take a look at this image! You can create the same effect in command prompt using just a few lines of code. Head over to this post for instructions.

    command prompt tricks

    3- Make Folders that you cannot delete
    Are you tired of accidentally deleting important folders? Well, if you are, you can learn how to makeundeletable folders here.

    4- Shutdown your computer giving a funny reason
    What if your computer shuts down saying that it is tired and doesn't want to work anymore? It would be fun, wouldn't it? You can do so by reading the instructions here.

    5- Know your IP address, DNS Server's address and a lot more about your Internet Connection
    Command Prompt can even let you know your IP address. Just type ipconfig/ all in the command prompt and press Enter. Along with your IP address and DNS servers, command prompt will also return a ton of information like your host name, primary DNS suffix, node type, whether IP Routing ,Wins Proxy, and DHCP are enabled, your network adapter's description, your physical (MAC) address etc .

    6- Know if your neighbours are stealing your Wifi connection
    command prompt codes
    Command Prompt can let you know if someone is connected to your Local Area Connection and using it. Just follow the steps:-
    1) Open your browser and visit http://192.168.1.1 or http://192.168.0.1 depending on your router.
    2) Find the tab that mentions “Attached Devices” or something similar.
    3) Find the computer name, IP address and MAC Address (sometimes called Physical Address or Hardware Address) of your computer using the previous trick.
    4 )Compare it with those displayed by your router in Step 2. If you notice some strange devices, then your neighbour has been sneaking in on your internet connection and it is best to ensure that yourwireless network is as secure as it can be.

    7- Know if someone is hacking your computer/ Trace a Hacker
    Command Prompt hacks
    Want to know if someone is hacking your computer? Command Prompt can help you find if someone you don't know is connected to your computer stealing private data. Just execute netstat -a and the command prompt will return a list of computers that your computer is connected to. In the results returned, Proto column gives the type of data transmission taking place (TCP or UDP) , Local address column gives the port with which your computer is connected to an external computer and the Foreign Address column gives the external computer you are connected to along with the port being used for the connection. State gives the state of the connection (whether a connection is actually established, or waiting for transmission or is “Timed Out”).

    These tricks work on Windows 8, Windows 7, Windows Vista, Windows XP and all previous versions of Windows.

    Now you know just how useful command prompt can be. Find more awesome tips and tricks in the Tricks section.
    Read more ...

    Convert FAT32 to NTFS Without Formatting or Losing Data

    Convert FAT32 to NTFS Without Formatting or Losing Data

    You have a flash drive or probably an external hard drive that currently has FAT32 file system and you want to change it to NTFS, because FAT32 does not support handling large files (over 4GB) or it is just simply old for your taste but there is just one problem, you don't want to lose your saved data. This article is for you then as it explains exactly how you can achieve seamless transition from FAT to NTFS without involving any data loss.

    FAT32 to NTFS

    While it is generally recommended to use the NTFS file system because of its stability, security and lesser defragmentation time, most of us end up using FAT32 because that is what most disks are preformatted with. Unless, we notice the “Not enough disk space error” despite disk space being available, we don't bother to change the file system. Moreover, most of us don't change it because of the risk of losing important data and lack of time (read laziness). As Microsoft was aware of this scenario, they added a capability in the command prompt to overcome this by executing a simple command. There are manysoftware that support this too but the Convert command is one of the easiest ways to do so. Follow the steps below to know how:-

    Important: While this method works perfectly, I would still advise you to backup your data in case anything goes wrong.

    FAT 32 to NTFS Conversion Steps

    1) Go to Computer, and note the name of the drive whose file system you wish to convert.
    2) Click on Start.
    3) Type cmd in the search bar if you use Windows 7, Windows 8 or Windows Vista. If you use Windows XP, click on Run and then execute cmd.
    4) Execute "chkdsk h: /f " (without quotes) where H is the letter of the drive to undergo conversion. This checks the drive for errors and fixes them automatically.
    5) Execute "Convert H: /FS:NTFS" (without quotes). H is again the letter of the drive to be converted.
    6) The command prompt will start the conversion process and after a few minutes, CMD will say that conversion was successful.
    7) You can check it in the properties of the drive through right click
    Convert FAT to NTFS

    This works on Windows 7, Windows XP, Windows 8 and Windows Vista. I converted my flash drive's file system using these steps and it worked flawlessly. It is interesting to note that this method cannot be used to reconvert NTFS file system back to FAT32. To reconvert back to FAT32, you will need to format the entire drive which will definitely cause data loss.
    Read more ...

    14 Ways to access blocked websites in schools/collages /offices

    14 Ways to access blocked websites in schools/collages /offices


    In many collages schools and offices, the management use to block many social networking and useful websites due to various reasons. Even our favorite sites like FACEBOOK, TWITTER, G MAIL, MYSPACE, HI5, and FREINDSTER are getting blocked these days. This article will let you know about the all possible ways to unblock websites on internet so that you can access the blocked websites easily. By using the below mentioned tricks you can unblock and open almost any websites on internet.

    Here you go, A COMPLETE GUIDE TO UNBLOCK WEBSITES ON INTERNET

    14 ways to access blocked websites


    1. Proxy websites to access blocked websites

    Proxy websites are nothing but of online proxy servers, Instead of directly connecting to the websites that are blocked at your place, you will first connect to a Proxy server and it will redirect to the blocked website and you can access them easily.
    There are many proxy websites available on internet, I can give you a huge list of them. But these are most widely used online proxies.

    1. http://www.hidemyass.com
    2. http://www.spysurfing.com
    3. http://kproxy.com/index.jsp
    4. http://proxify.com/
    5. http://www.proxymouse.com

    How to open blocked websites using Hidemyass,

      First goto HIDEMYASS website.Enter the URL of the blocked website in the input Box and click on the button HIDEMYASS. Instantly it will show the blocked website.


    You can use this simple method to access all the static websites and can access them quite easily, IF even HIDEMYASS website is blocked in your collage, school or office just pick any other proxy website from the above list it will work fine.

    2. Use Tor Browser to surf anonymously to open blocked sites.

    Using the above method you can only access the static websites, you can't use social networking sites like Facebook, twitter, MYSPACE…etc. because social networking sites uses browser to store cookies and that can’t be possible by using these Proxy websites. So, here is an alternate way 
    Using TOR  you can browse anonymously on internet. Its most widely used utility for hiding our identity online. Just Download it from the below link and start using it

    3. Hola browser extension to Unblock websites.


    Hola is Browser extension available for all popular browsers, by using this extension you can browse on internet anonymously. Just check the official website of HOLA and install the browser extensions directly from there.

    4. Use Proxy IP address in browser settings.

    Few of the browsers supports to use the PROXY IP address in them. So that if you can surf anonymous using them. To use this you need Mozilla fire fox web browser and Proxy Ip address. You can get the huge list of Proxy websites from HERE.
    In your Mozilla Firefox browser open the OPTIONS box and click on ADVANCED. Below the CONNECTIONS select SETTINGS. Click on MANUAL PROXY SETTINGS and enter the PROXY IP address (click HERE for PROXY IP address list), Port 8080 there and save settings. With this your browser will surf using that proxy ip address. You can pick and change the other Proxy IP address if that’s not working.

    5. Access Blocked websites by Using Way Back Machine.

    WayBackMachine is a through which we can know about the previous Look of any website from its archives. Enter the URL of the blocked website and you can even access the previous versions of the website that are blocked at your Place.

    6. Use IP address instead of domain name

    Collages/schools and websites normally block websites using some software’s in which they enter URL’s of the Websites they need to block, so that whenever if you enter the domain name of any website they will simply get blocked. So you can access those websites if you enter the IP address of the websites
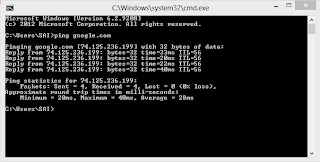
    To find the IP address of the website just open  your command prompt on your Windows PC by pressing WIN+R > type CMD > hit ENTER. Now in the Command prompt just enter the following code.
    Ping website.com (enter the blocked website in the place of website.com).
    Now enter that IP address on your browser and you can access the BLOCKED websites.

    7. Open Blocked sites using decimal code.

    In the above method I asked you to use the IP address, but what if even the IP address of the website that you need open was also blocked?? 
    By using the decimal numbers you can access any blocked websites, because none will even block the IP address in decimal. To get the decimal code of IP address using THIS TOOL 
    For example IP address of google is http://74.125.236.160/ you can use the decimal format instead HTTP://1249766560

    8.  Take help of Google cache


    Google store the cache of each and every website often. You can access the cache of any website using googles old CACHE. Just search for the BLOCKED website which you need to open and click on the CHACHE link below the search results as shown in the below screen shoot.

    9. Using Translation web services

    There are many website on the internet GOOGLE - TRANSLATE and BING - TRANSLATE like which will convert the whole page from one language to another. Enter the URL of the blocked website in those site and convert the web page into another language. From this you can convert the whole page into another language and can access it.

    10. Browsing on HTTPS connection


    HTTPS is nothing but of the secure connection, where data will be encrypted. This trick will work in many colleges and schools (This trick even worked in my Collage). Instead of using HTTP use HTTPS and try to access the website. For example you need to visithttp://www.google.com then try https://www.google.com and try to access the site.

    11. Open blocked websites Using URL shortners

    Normally URL shornters are used to shorten the length of the lengthy websites. By using such sites you can bypass the security and access the websites. Try using TINY URL MooURL

    12. Get an email of the webpage using web2mail


    Web2mail is a free site which will let you to get the mail of any webpage that you requested. Check the site for more details. You can get any blocked website as mail to you so that you can access them VIA your email.

    13. Use VPN software’s and Unblock websites


    VRN software’s will let you to browse anonymously, you just need to download and install them on your PC. There are both paid and free VPN software’s available. Here are 3 best VPN software’s that will allow you to unblock websites.

    1. HotspotShield VPN
    2. TunnelBear Vpn
    3. ProXPN VPN

    14. Post Comment below 

    We will try to help your, Comment below and we will try to help your problem in unblocking websites.


    Read more ...

    Thursday 13 March 2014

    How to Find the IP Address of Your PC

    How to Find the IP Address of Your PC

    Finding Your External IPFinding Your Internal IP on Any Windows PCFinding Your Internal IP in Windows Vista/7
    Edited by steve, Bex, Troy, Jeff LeBlanc and 86 others
    When your PC is connected to a network, it is assigned an address on the network called an IP address. If the PC is connected to a network as well as the internet, then the PC will have an internal IP address which marks its location on the local network, and an external IP, which is the IP address of your internet connection. Follow this guide to find both.

    Method 1 of 3: Finding Your External IP

    1. Find the IP Address of Your PC Step 1.jpg
      1
      Open your router’s configuration page. Almost all routers can be accessed through a web interface where you can see and adjust settings. Open the web interface by entering the router’s IP address into a web browser. Check your router’s documentation for the specific address. The most common router addresses are:
      • 192.168.1.1
      • 192.168.0.1
      • 192.168.2.1
      Ad
    2. Find the IP Address of Your PC Step 2.jpg
      2
      Open your Router Status. The location of the external IP address will vary from router to router. Most have it listed in the Router Status or WAN (Wide Area Network) Status.[1]
      • Under Internet Port in the Router Status, your IP address should be listed. The IP address is 4 sets of digits, with up to three digits per set.
      • This is the IP address of your router. Any connections made out of your router will have this address.
      • This IP address is assigned to you by your internet service provider. Most external IP addresses are dynamic, which means they change from time to time. This address can be masked using proxies.
    3. 3
      Use a web service. If you don’t have access to your router, or are connected directly to your internet modem, you can use a variety of web sites that will display your address for you.
      • Entering "ip address" into Google's search engine will display your external IP.
        Find the IP Address of Your PC Step 3Bullet1.jpg

    Method 2 of 3: Finding Your Internal IP on Any Windows PC

    1. Find the IP Address of Your PC Step 4.jpg
      1
      Open the command prompt. Press the Windows + R keys and enter “cmd” into the field. Press enter to open the command prompt.
      • In Windows 8, press the Windows + X keys and select the Command Prompt from the menu.
    2. Find the IP Address of Your PC Step 5.jpg
      2
      Type “ipconfig” and press enter. This will display a list of your network connection information. Near the top of the list, look for “IPv4 Address” under either Wireless Network Connection or Local Area Connection (depending on if your computer is using Wi-Fi or not).
      • The IP address is 4 sets of digits, with up to three digits per set. The typical internal IP address will look like: 192.168.X.X
        Find the IP Address of Your PC Step 5Bullet1.jpg
      • The ipconfig printout is long, you may have to scroll up to find the IPv4 address.

    Method 3 of 3: Finding Your Internal IP in Windows Vista/7

    1. Find the IP Address of Your PC Step 6.jpg
      1
      Open the Start menu. Right-click on Network and then choose Properties from the drop-down menu.
    2. 2
      Click the View Status button. This will be located next to either Local Area Connection or Wireless Network Connection, depending on if your computer is connected to the network through Ethernet or Wi-Fi.
      • In Windows 7, click the name of the network listed next to Connections instead of clicking View Status.
        Find the IP Address of Your PC Step 7Bullet1.jpg
    3. Find the IP Address of Your PC Step 8.jpg
      3
      Select Details.
      • Your IP address will show up next to "IPv4 IP Address.”[2]
        Find the IP Address of Your PC Step 8Bullet1.jpg
    Read more ...

    How to Test Network and Internet Latency

    How to Test Network and Internet Latency (Lag) in Microsoft Windows

    Edited by Nick Nicholls, Marie, Jack Herrick, Zach and 26 others
    Have you just connected a Windows PC to a network or the Internet? Want to know the easiest way to check connectivity? Both the "ping" and "tracert" commands will help you measure latency, also known as "lag." Follow these steps to test your internet latency.

    Steps

    1. Test Network and Internet Latency (Lag) in Microsoft Windows Step 1   Version 2.jpg
      1
      Go to Start > Run and type cmd. You can also search for cmd.exe in the Windows Search function.
      Ad
    2. Test Network and Internet Latency (Lag) in Microsoft Windows Step 2   Version 2.jpg
      2
      Press OK to launch Windows Command. This is the default command-line interface for Windows.
    3. 3
      Test the loop-back address.
      • Type ping 127.0.0.1 (it is the same for every computer, so you do not need to change this). This will test your computer's network chip, not your modem, router, or Internet connection.
        Test Network and Internet Latency (Lag) in Microsoft Windows Step 3Bullet1   Version 2.jpg
      • Press Enter to begin pinging.
        Test Network and Internet Latency (Lag) in Microsoft Windows Step 3Bullet2   Version 2.jpg
      • Place -t at the end of the command to perform continuous testing.
        Test Network and Internet Latency (Lag) in Microsoft Windows Step 3Bullet3   Version 2.jpg
      • To exit continuous testing, press Ctrl+C.
        Test Network and Internet Latency (Lag) in Microsoft Windows Step 3Bullet4   Version 2.jpg
      • Place -n 20 at the end of the command to send 20 pings. Replace the number 20 with any value (the value will be limited to a 32-bit or 64-bit integer).
        Test Network and Internet Latency (Lag) in Microsoft Windows Step 3Bullet5   Version 2.jpg
      • If everything is correct, you will see something like:
        Test Network and Internet Latency (Lag) in Microsoft Windows Step 3Bullet6   Version 2.jpg
      • Look at the ping statistics. They should report a 0% loss.
        Test Network and Internet Latency (Lag) in Microsoft Windows Step 3Bullet7   Version 2.jpg
      • Keep an eye on the response time, as it represents the connection's latency between you and the server. Double digit values (such as 50ms, or lower) are very good. This varies drastically depending upon where the server is in relation to your computer. Generally, most connections should have latency less than a few hundred milliseconds. If there is no network connection, you will see the output "Request timed out" repeated.
        Test Network and Internet Latency (Lag) in Microsoft Windows Step 3Bullet8   Version 2.jpg
    4. 4
      Test your local gateway. Find your default gateway's IP address:

      • Type ipconfig in the command prompt window.
        Test Network and Internet Latency (Lag) in Microsoft Windows Step 4Bullet1   Version 2.jpg
      • Press Enter. The command prompt will then display the output from the ipconfig command.
        Test Network and Internet Latency (Lag) in Microsoft Windows Step 4Bullet2   Version 2.jpg
      • Find the listing for "Default Gateway". This is the IP you can use in a ping to test the connection between your computer and your router or ISP.
        Test Network and Internet Latency (Lag) in Microsoft Windows Step 4Bullet3   Version 2.jpg
    5. Test Network and Internet Latency (Lag) in Microsoft Windows Step 5   Version 2.jpg
      5
      Test beyond your local network. Test the connectivity of your modem, router, network, or internet connection by using an IP address on the Internet.
    6. Test Network and Internet Latency (Lag) in Microsoft Windows Step 6   Version 2.jpg
      6
      Check domain name resolution. Instead of an IP address, type in a site's domain name, such as www.google.com. Pinging a domain name tests your computer and network's ability to resolve network names (translating them to IP addresses).
    7. 7
      Measure network and internet performance (Windows NT, 2000, XP, and Vista only). Use the tracert command to measure the response of each hop in a network path. Your connection to any one server will require multiple "hops" between other servers and networking components. The fewer number of hops, the better. Most connections to a server on the Internet will include at least a dozen hops. To test:

      • With the command prompt open, type tracert xxx.xxx.xxx.xxx, replacing xxx.xxx.xxx.xxx with an IP address on the internet.
        Test Network and Internet Latency (Lag) in Microsoft Windows Step 7Bullet1   Version 2.jpg
      • Press Enter and watch as each hop is pinged and logged. The first ping should be your computer, modem, or router, and the last ping should be your target address.
        Test Network and Internet Latency (Lag) in Microsoft Windows Step 7Bullet2   Version 2.jpg
      • Notice that the response time for points farther away from you will be greater than those closer to you.
    Read more ...
    Designed By Blogger Templates