Monday, 08 December 2008 23:06 | Written by Milos Stankovic
3 1Email0
In the first chapter of our series of Joomla tutorials, we will cover the installation of a web server software on your local computer. To run Joomla, we need a webserver enabled with php and mysqldatabase. Most of you have the PC computers with Windows XP or Vista. Therefore, with your operating system alone, you don't have what's necessary to run Joomla locally.
What's advantages of running Joomla locally? First, you can test it and develop websites without the hosting package. Second, it's faster than working with Joomla on the remote server. And finally, it allows you to have a mirror of your website on your local computer. You can use it as backup as well. Or you can make changes locally and (if satisfied) upload them on the live server.
Let's start!
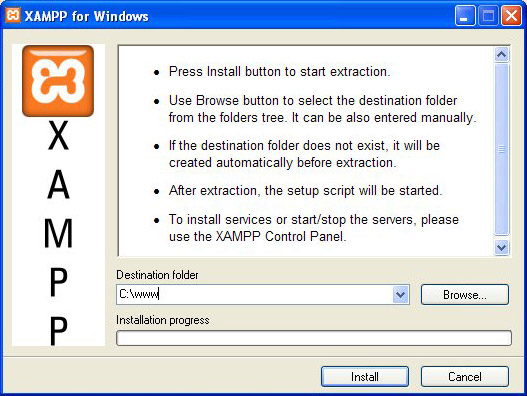
2. Run this file on your computer. Type destination folder (we used C:\www) and click Install. Please wait a few minutes while files are unpacking.

3. MS-DOS prompt will be opened automatically. It will ask you to add shortcuts for XAMPP on your desktop. Default is Y (yes), but you may also type N (no). Click

4. If you are not installing in the root folder, the installer will inform you that configuration files should be edited. Click

5. I guess you are installing on the hard disk. So you should use drive letters. Click

6. Now, you should get this message. XAMPP is informing you that needed tasks are done and that you can continue. Click

7. The next message is informing you about detected time zone that your server will use. Click

8. Type 1 (number one) and click

9. Now, it's time to get familiar with the XAMPP Control Panel. To run Joomla locally, you should activate two Windows services here: Apache and MySQL. First, click on the checkbox left from Apache (marked with Svc). A new window will open asking you to confirm installing the service. Click OK. Repeat this for MySQL.

10. Now we can start installed Apache and MySQL services. Click on the Start button next to Apache and wait until the green message Running appears. Button Start is now changed to button Stop. Repeat this for the MySQL service. After that, you may click Exit to close the XAMPP Control Panel.

11. At this moment, your computer should be ready to execute server-side programs locally. Let's test what we have done. Open your favorite browser and type localhost in the address bar. Hit

12. Welcome screen confirms that you installed everything correctly. The next steps are optional. We will continue with XAMPP security aspects. If you are not on a shared computer and your computer can't be accessed through the network, you probably don't need the next steps. If you want to continue, click on the Security link.

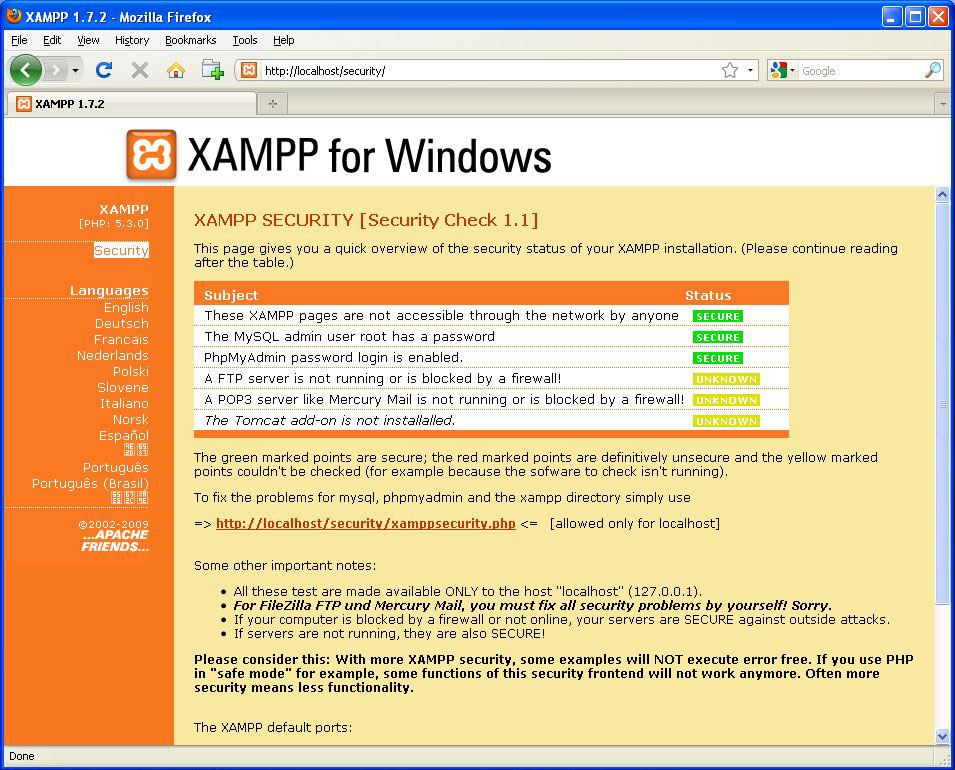
13. On this page, XAMPP informs you why your server is not secure yet. So, let's make it more secure. Click on link http://localhost/security/xamppsecurity.php to continue.

14. First, you should set a password for MySQL SuperUser. This user (root) has full access over the MySQL server. Type password twice and click the Password changing button. You should get a message as on this screenshot after clicking the button.

15. Finally, you should secure XAMPP settings. Type user name and password and click Secure the XAMPP directory button. You should get message as on our screen shot after that.

16. Click on Security link again. XAMPP will now ask you for your user name and password. You selected those in the previous step. Type them and click OK.
17. If all went well, you should see the Secure statuses now.
Conclusion:
Congratulations! Now, you have an Apache server enabled with PHP and MySQL on your local computer. That's all you need to install Joomla 1.5. Moreover, you can install and test many other popular software. Theoretically, you can install everything that's written in PHP and use MySQL database for data storage (Wordpress, Drupal, phpBB, Gallery2, and many more).
No comments:
Post a Comment